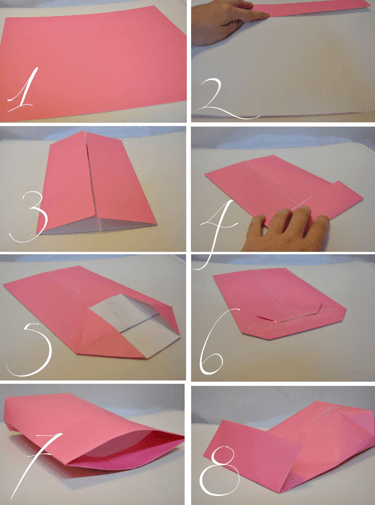
Are you looking for a creative way to present gifts? Making your own gift bag out of paper is not only fun but also allows you to customize it according to your preferences. Whether you need a small gift paper bag for a special occasion or want to create a custom gift paper bag that stands out, this guide will walk you through the steps. Grab your materials and let’s get started!
Materials You’ll Need:
Before we dive into the steps, gather these materials:
- Thick paper or cardstock
- Scissors
- Ruler
- Pencil
- Glue or double-sided tape
- Decorative elements (optional)
Step-by-Step Guide to Making a Paper Gift Bag:
1. Choose Your Paper:
Begin by selecting the paper for your gift bag. Cardstock works best as it provides durability. You can choose plain colored paper or patterned paper for a more decorative look.
2. Measure and Cut:
Measure the Paper:
Determine the size of your gift bag by considering the dimensions of the gift you intend to place inside. A standard size for a small gift bag is around 8 inches by 10 inches.
Cut the Paper:
Using a ruler and pencil, mark the dimensions on the paper. Cut out the shape carefully to ensure neat edges.
3. Fold the Paper:
Create Fold Lines:
Along the longer side of the paper, measure and mark where you will make the folds. Typically, you’ll make three folds: one for the base of the bag and two for the sides.
Make the Folds:
Fold the paper along the marked lines. Use a ruler to press down firmly on each fold to create crisp edges.
4. Glue or Tape the Sides:
Apply Glue or Tape:
Along one edge of the paper, apply glue or double-sided tape. This will secure the sides of the bag.
Form the Bag Shape:
Bring the edges together to form a tube shape, pressing firmly to secure the adhesive. Hold in place until dry.
5. Create the Bottom of the Bag:
Open the Base:
Flatten out the bottom of the bag and fold the edges inward to create a square or rectangular base.
Secure the Base:
Apply glue or tape to the folded edges and press them together firmly. Hold until the adhesive sets.
6. Customize Your Bag (Optional):
Add Decorative Elements:
Get creative by adding ribbons, stickers, or other embellishments to personalize your gift bag. This step allows you to make a custom gift paper bag that reflects your style and the occasion.
7. Let It Dry:
Allow Time to Dry:
Once assembled and decorated, allow your paper gift bag to dry completely before placing any gifts inside. This ensures that the bag holds its shape and the decorations stay in place.
Conclusion:
Now that you’ve followed these steps, you’ve successfully created a handmade gift bag out of paper. Whether you’re making a small gift paper bag for a birthday or a custom gift paper bag for a special event, this DIY project adds a personal touch to your gift-giving.
Remember, the beauty of making your own gift bag is the ability to tailor it to suit any occasion and to match your recipient’s taste. Have fun experimenting with different paper colors and decorations to create unique and memorable gift bags that will delight your loved ones.
Try making your next gift even more special with a handmade paper gift bag. It’s a simple yet thoughtful way to show you care!


